Terraform Associate
IaC Concepts
What is Infrastructure as Code
Infrastructure as Code (IaC) is the process of managing and provisioning computer data centers through machine-readable definition files, rather than physical hardware configuration or interactive configuration tools.
You write a configuration script to automate creating, updating or destroying cloud infrastructure.
- IaC is a bluepring of your infrastructure
- IaC allows you to easily share, version or inventoru your cloud infrastructure
Popular Infrastructure as Code tools
Declarative:
- More verbose, but zero mis-configuration
- use JSON YAML XML or HCL
Imperative:
- less verbose, but more prone to mis-configuration
- use Python, Ruby, Go, Js etc
| Decalrativie | Imperative |
|---|---|
| ARM Templates | AWS Cloud Development Kit (CDK) |
| Azure Blueprints | Pulumi |
| Cloud formation (AWS) | |
| Cloud Deployment Manager (GCP) | |
| Terraform |
Infrastructure Lifecycle
Infrastructure Lifecycle is a number of clearly defined steps that are used by DevOps to plan, design, build, test, deliver, maintain and retire cloud infrastructure.
Infrastructure Lifecycle Advantages
- Reliability: IaC is idempotent*, consistent, repeatable and predictable.
- Manageability: IaC is easy to understand, easy to change and easy to collaborate.
- Sensibility: IaC is easy to audit, easy to test and easy to rollback.
(*) Idempotent: the result of multiple identical requests is the same as the result of a single request.
Provisioning vs Deployment vs Orchestration
Previsioning is the process of preparing a new computer system for use.
Provisioning could be performed by using tools such as Puupet Ansible, Chef, Bash script…
Deployment is the process of installing, configuring, testing and activating a computer system for use.
Deployment could be performed by using AWS CodePipeline, Harness, Jenkins, Github Actions, GitLab CI/CD…
Orchestration is the automated configuration, coordination and management of computer systems and software.
Orchestration could be performed by using tools such as Kubernetes, Docker Swarm, AWS ECS, AWS EKS, AWS Fargate…
Configuration Drift
Configuration drift is a term used to describe the fact that the current configuration of a system does not match the configuration that was originally intended.
Configuration drift could be caused by:
- manual changes
- software updates
- hardware changes
- security patches
- …
To detect configuration drift, you can use tools such as AWS Config, Azure Policy, Terraform Enterprise, Puppet Enterprise, Chef Automate, Ansible Tower…
To remediate configuration drift, you can use tools such as AWS Config, Azure Policy, Terraform Enterprise, Terraform plan/refresh Puppet Enterprise, Chef Automate, Ansible Tower…
Mutable vs Immutable Infrastructure
Mutable Infrastructure is a type of infrastructure that can be changed after it is provisioned.
Develop -> Deploy -> Configure (cloud-init)
Immutable Infrastructure is a type of infrastructure that cannot be changed after it is provisioned.
Develop -> Configure (Packer) -> Deploy
What is GitOps
GitOps is a way to do Continuous Delivery, it works by using Git as a single source of truth for declarative infrastructure and applications.
To deploy your infrastructure, you simply need to push your code to Git, review, create a merge request and accept it.
Immutable Infrastructure Guarantee
**A revoir**Hashicorp Introduction
HashiCorp
Hashicorp is a company that provides a suite of open-source tools and commercial products that enable developers, operators and security professionals to provision, secure, run and connect cloud-computing infrastructure.
HCL is cloud agnostic*
(*) Cloud agnostic: not tied to a specific cloud provider.
Hashicorp Products
- Terraform: Infrastructure as Code
- Terraform Cloud: Collaboration and Governance with teams
- Vault: Secrets Management, Encryption as a Service, Data Protection, Identity-based Access, secret for applications, databases, cloud, infrastructure, etc.
- Consul: Service Networking
- Nomad: Application Orchestration
- Boundary: Privileged Access Management (remote access)
- Waypoint: Application Delivery
- Packer: Build Machine Images for later deployment
- Vagrant: Development Environments
- Sentinel: Policy as Code
What is Terraform
Terraform use declarative configuration files.
Features:
- Install modules
- Plan and apply changes
- Destroy resources
- Manage state
- Provision resources
- Manage multiple providers
What is Terraform Cloud
Terraform Cloud is a SaaS application that helps teams use Terraform together. It manages Terraform runs in a consistent and reliable environment, and includes easy access to shared state and secret data, access controls for approving changes to infrastructure, a private registry for sharing Terraform modules, detailed policy controls for governing the contents of Terraform configurations, and more.
Terraform Lifecycle
code -> init -> plan <-> valide -> apply -> destroy*
(*) destroy is optional
Execution Plans
Plan is a detailed blueprint of the changes Terraform will make to your infrastructure.
Visualizing Execution Plans
Terraform graph terraform graph | dot -Tsvg > graph.svg (default format .gv) command creates a visual representation of either a configuration or execution plan.
Resource Graph
Resource Graph shows the dependencies between resources in your infrastructure.
Resource Node is represented by a rectangle.
Resource Meta-Node is represented by a circle.
Provider Configuration Node is represented by a hexagon.
Use Cases
IaC is used to:
- Provision and manage any cloud, infrastructure or service
- Create your own Terraform provider or module
- Mutlti-Tier Architecture, it make easy to devide large and complex application into isolated configuration files (module)
- Create a temporary environment for testing
- Resource Schedulers, it can be used to schedule resources to be created or destroyed at a specific time
- Multi-Cloud, it can be used to manage multiple cloud providers
Core and Plugins
Terraform Core is responsible for:
use remote procedure calls (RPC) to communicate with plugins. (write in Go language)
Terraform Plugins are responsible for:
expose an implementation for a specific service, or provisioner.
Best Practices
Terraform Provisioners
Terraform Provisioner
cloud-init is an industry standard to initialize cloud instances.
Packer is an automated image-builder service. You provide a configuration file (playbook.yml) to create and provision the machine image. For that, you need to create an image to use it as a base image, and then you can use it to create a new images. In your packer configuration file, you can reference your playbook file like this.
provisioner "ansible" { "type": "ansible", "playbook_file": "playbook.yml"}when you create a cloud-init file, you can reference it in your Terraform configuration file like this.
resource "aws_instance" "example" {  ami           = "ami-abc123"  instance_type = "t2.micro"
  user_data = file("init.sh")}
or
resource "aws_instance" "example" {  ami           = "ami-abc123"  instance_type = "t2.micro"
  user_data = <<-EOF              #!/bin/bash              echo "Hello, World" > index.html              nohup busybox httpd -f -p "${var.server_port}" &              EOF}
or
users: - default - name: terraform gecos: terraform sudo: ALL=(ALL) NOPASSWD:ALL groups: users, admin ssh_import_id: lock_passwd: false ssh_authorized_keys: - ssh-rsa AAAAB3NzaC1yc2Epackage_upgrade: yespackage_update: yespackages: - httpdruncmd: - sudo systemctl start httpd - sudo systemctl enable httpddata "template_file" "user_data" { template = file("config.yaml")}
resource "aws_instance" "example" { ami = "ami-abc123" instance_type = "t2.micro" subnet_id = aws_subnet.example.id vpc_security_group_ids = [aws_security_group.example.id] associate_public_ip_address = true user_data = data.template_file.user_data.rendered
tags = { Name = "HelloWorld" }}You can use Ansible with packer to reference your playbook file
Local Exec
You can execute commands line on your Laptop, on Terraform Cloud, or on GCP Cloud Build, AWS Code Build, Jenkins, …
examples:
resource "terraform_data" "example1" { provisioner "local-exec" { command = "open WFH, '>completed.txt' and print WFH scalar localtime" interpreter = ["perl", "-e"] }}resource "aws_instance" "web" { # ...
provisioner "local-exec" { command = "echo $FOO $BAR $BAZ >> env_vars.txt"
environment = { FOO = "bar" BAR = 1 BAZ = "true" } }}- command: the command to execute (required)
- interpreter: the interpreter to use to execute the command (optional)
- working_dir: the directory to execute the command from (optional)
- environment: a map of environment variables to set prior to execution (optional)
- on_failure: the behavior to apply if the command fails (optional)
Remote Exec
remote-exec provisioner invokes a script on a remote resource after it is created. This can be used to run a configuration management tool, bootstrap into a cluster, etc.
resource "aws_instance" "web" {  # ...
  provisioner "remote-exec" {    inline = [      "puppet apply",      "consul join ${aws_instance.web.private_ip}",    ]  }}
resource "aws_instance" "web" { # ...
provisioner "remote-exec" { script = "script.sh" }}File
The file provisioner is used to copy files or directories from the machine executing Terraform to the newly created resource.
resource "aws_instance" "web" {  # ...
  provisioner "file" {    source      = "conf/myapp.conf"    destination = "/etc/myapp.conf"  }}
Connection
The connection block is used to define the connection details for connecting to a resource. This is typically used by provisioners to connect to a resource after it is created.
provisioner "file" {    source     = "conf/myapp.conf"    destination = "/etc/myapp.conf"
    connection {        type     = "ssh"        user     = "ubuntu"        password = ${var.password}        host     = ${var.host}    }}
Null Resources
The null_resource is a placeholder for resources that have no specific association to a provider resources. It is commonly used with provisioners to execute a command on a local machine.
resource "null_resource" "cluster" {  triggers = {    cluster_instance_ids = join(",", aws_instance.example.*.id)  }
provisioner "local-exec" { command = "echo ${aws_instance.example.*.id} > instance_ids.txt" }}- trigger is used to force the null_resource to re-run provisioners if a configuration value changes.
Terraform Data
It’s similar to null_resource, but does not require the configuration of a provider.
resource "null_resource" "main" {  triggers = {    version = var.version  }
  provisioner "local-exec" {    command = "echo ${self.triggers.version}"  }}
to
resource "terraform_data" "main" {  triggers_replace = {    version  }
  provisioner "local-exec" {    command = "echo ${self.triggers_replace}"  }}
Terraform Providers
Providers
AWS | Azure | GCP | Kubernetes | Oracle | VMware | …
Registry
Terraform Registry is a website to browse and search for Terraform providers and modules. Providers are used to interact with the resources supported by a specific cloud provider. Modules is a group of configurations that provide common configuration functionality, it allows to :
- apply best practices
- avoid repeating the same code
- avoid re-inventing the wheel
- reduce amount of code
- reduce time to develop
Providers Command
terraform providers command is used to display the providers and modules required/used for this configuration.
Providers Configuration
provider "aws" {  alias  = "west"  region = "us-west-1"}
terraform {  required_providers {    aws = {      source  = "hashicorp/aws"      version = "~> 3.0"      configuration_aliases = [cloudAws.west]    }    azurerm = {      source  = "hashicorp/azurerm"      version = "~> 2.0"    }  }}
resource "aws_instance" "example" {  provider = aws.west # refere to the provider alias  # ...}
Terraform Language
Terraform Language
Terraform Language is a declarative language used to define infrastructure as code.
resource "aws_instance" "example" {  ami           = "ami-abc123"  instance_type = "t2.micro"}
<BLOCK_TYPE> "<BLOCK_LABEL>" "<BLOCK_LABEL>" {  <IDENTIFIER>           = <EXPRESSION>}
Alternate JSON Syntax
{ "resource": { "aws_instance": { "example": { "ami": "ami-abc123", "instance_type": "t2.micro" } } }}Terraform Settings
terraform { required_providers { aws = { source = "hashicorp/aws" version = "~> 3.0" } }}Variables and Data
Input Variables
variable "region" { type = string default = "us-east-1" # if you dont set the value, it will use the default value description = "The region where the EC2 instance will be created" # description of the variable validation { condition = length(var.region) > 0 error_message = "You must specify a region" } sensitive = true # hide the value during terraform plan & apply but not in the state file # the recommendation is to store the tfsate file in a secure place (Terraform Cloud, S3 bucket) and to enable encryption}Variable Definition Files
The file name must end with .tfvars or .tfvars.json, by default is terraform.tfvars or terraform.tfvars.json.
region = "us-east-1"
# or
region = {  name = "us-east-1"}
# or
variable "list_type" { description = "This is a variable of type list" type        = list(string) default     = ["string1", "string2", "string3"]}
Variables vs Environment Variables
If you define a variable as an environment variable, it will override the value of the variable in the variable definition file.
export TF_VAR_region=us-east-1
If you define a variable as sensitive, it will not be displayed in the console.
export TF_VAR_access_key="<access_key>"
Loading Input Variables
If you name your file terraform.tfvars it will be loaded automatically.
If you name it name_file.auto.tfvars it will be loaded automatically.
If you name it name_file.tfvars you need to use the -var-file flag.
You can specify a variable on CLI with the -var flag -var ec2_type="t2.large". \
Output Values
Output values are like the return values of a Terraform module, and have several uses:
- A child module can use outputs to expose a subset of its resource attributes to a parent module.
- A root module can use outputs to print certain values in the CLI output after running terraform apply.
- A calling module can use outputs to use a module’s return values in other ways.
output "instance_ip_addr" { value = aws_instance.example.public_ip}The value of the output are visible in the console after running terraform apply and in the state file, even sensitive values.
terraform output command is used to display the output values.
terraform output -json command is used to display the output values in json format.
terraform output name command is used to display the output value of a specific output. \
Local Values
# you can define multiple local blocks# you can refer local values in other local blocks
locals {  region = "us-east-1"  azs    = ["us-east-1a", "us-east-1b", "us-east-1c"]}
locals {  az_count  = length(local.azs) # you can use the local value}
resource "aws_instance" "example" {  ami               = "ami-abc123"  instance_type     = "t2.micro"  availability_zone = local.azs[0] # you can use the local value}
Data Sources
data "aws_ami" "web" { # specify the kind of resource you want to get  filter {    name   = "name"    values = ["amzn-ami-hvm-*"]  }
  filter { # you can specify multiple filters    name   = "owner-alias" # you can use the name or the id    values = ["amazon"] # you can specify multiple values  }
  filter {    name   = "virtualization-type"    values = ["hvm"]  }
  most_recent = true # get the most recent ami}
resource "aws_instance" "web" {  ami           = data.aws_ami.web.id # you can use the id or the name  instance_type = "t2.micro"}
References to Named values
to reference various variables:
Resources : aws_instance.example.id
Data Sources : data.aws_ami.web.id
Modules : module.vpc.vpc_id
Local Values : local.region
Variables : var.region
Functions : formatlist("%s-%s", var.region, var.env)
Meta Arguments
Resource Meta Arguments
Meta arguments are used to change the behavior of resources:
- depends_on : specify the order of creation of resources
resource "aws_instance" "example" {  ami           = "ami-abc123"  instance_type = "t2.micro"}
resource "aws_instance" "example2" { ami = "ami-abc123" instance_type = "t2.micro" depends_on = [aws_instance.example] # specify the order of creation of resources}- count : create multiple resources
resource "aws_instance" "example" { count = 3 # create 3 resources ami = "ami-abc123" instance_type = "t2.micro"}- for_each : create multiple resources
locals {  instance_type = {    us-east-1 = "t2.micro"    us-east-2 = "t2.nano"  }}
resource "aws_instance" "example" { for_each = local.instance_type # create 2 resources ami = "ami-abc123" instance_type = each.value}- provider : specify the provider to use
provider "aws" {  region = "eu-west-1"}
# create a resource in another regionprovider "aws" {  alias  = "america"  region = "us-west-1"}
resource "aws_instance" "example" { provider = aws.america # refere to the provider alias ami = "ami-abc123" instance_type = "t2.micro"}- lifecycle : specify the behavior of the resource
resource "azure_resource_group" "example" {    name     = "example"    location = "West Europe"
lifecycle { create_before_destroy = true # create the new resource before destroying the old one # or prevent_destroy = true # prevent the resource from being destroyed # or ignore_changes = [ tags, location ] # ignore changes on tags and location }}- provisioner : specify the provisioner to use, it’s used to execute commands on the local machine or on the remote machine (Script.sh / Packer / Ansible / Cloud-init, etc…)
resource "aws_instance" "example" {  ami           = "ami-abc123"  instance_type = "t2.micro"
  provisioner "local-exec" {    command = "echo ${self.private_ip} > private_ip.txt"  }  # or  provisioner "remote-exec" {    inline = [        "puppet apply",        "consul join ${aws_instance.example.private_ip}",    ]  }}
Expressions
Types and Values
All value have a type, and all types are known by Terraform. \
primitive types:
- bool :
trueorfalse - number :
1,2.5,-3 - string:
"hello"<<EOF ...<write multi lines>... EOF"${var.region}""%{if var.region == "us-east-1" }true%{else}false%{endif}"
non-primitive types:
- null :
endpoint = null
complex types:
- list :
[1, 2, 3],["hello", "world"] - map :
{key1 = "value1", key2 = "value2"} - object :
{key1 = "value1", key2 = "value2"} - tuple :
["hello", "world"] - set :
["hello", "world"] - any :
any
Expressions Operators
- Arithmetic Operators:
+: addition-: subtraction*: multiplication/: division%: modulo^: exponentiation+: unary plus-: unary minus==: equal!=: not equal>: greater than>=: greater than or equal<: less than<=: less than or equal&&: logical and||: logical or!: logical not? :conditional‡:: conditional.: attribute access[]: index access(): function call‡
For Expressions
list : [for x in var.list : upper(x)]
map : {for k, v in var.map : length(k) + length(v)}
set : {for x in var.set : x if x != "b"} \
[] -> [for x in var.list : upper(x)] return a tuple/list -> ["HELLO", "WORLD"]\
{} -> {for k, v in var.map : k => length(v)} return a map/object -> {key1 = 6, key2 = 2}\
Splats
Splats are used to expand a complex value into a list of values.
[*] -> instead of [for x in var.list : x.id] use var.list[*].id -> ["id1", "id2", "id3"]
[*] -> instead of [for k, v in var.map : k] use var.map[*] -> ["key1", "key2"]
[*] -> instead of [for k, v in var.map : v] use var.map[*] -> ["value1", "value2"] \
Dynamic Blocks
Dynamic blocks are used to construct nested blocks repeatedly according to a list value.
locals {  ebs_block_device = [    {      device_name = "/dev/sdh"      volume_size = 20      volume_type = "gp2"    },    {      device_name = "/dev/sdi"      volume_size = 40      volume_type = "gp2"    },  ]}
resource "aws_instance" "example" {  ami           = "ami-abc123"  instance_type = "t2.micro"
  dynamic "ebs_block_device" {    for_each = local.ebs_block_device    content {      device_name = ebs_block_device.value.device_name      volume_size = ebs_block_device.value.volume_size      volume_type = ebs_block_device.value.volume_type    }  }}
Version Constraints
Operators:
=: Match exact version number"1.0.0"->"=1.0.0"=: Match exact version number"1.0.0"->"=1.0.0"!=: Match any version number except the one specified"1.0.0"->"!=1.0.0">: Match any version number greater than the one specified"1.0.0"->">1.0.0">=: Match any version number greater than or equal to the one specified"1.0.0"->">=1.0.0"<: Match any version number less than the one specified"1.0.0"->"<1.0.0"<=: Match any version number less than or equal to the one specified"1.0.0"->"<=1.0.0"~>: Match any version number greater than or equal to the one specified, up to the next major version"1.0.0"->"~>1.0.0"
MAJOR version when you make incompatible API changes.
MINOR version when you add functionality in a backwards compatible manner.
PATCH version when you make backwards compatible bug fixes.
String Templates
variable "region" {  type = string}
variable "env" {  type = string}
variable "name" {  type = string}
variable "tags" { type = map(string)}region = "us-east-1"env = "dev"name = "example"
tags = { env = var.env name = var.name}Terraform State
State
The state file is used to store the current state of your infrastructure.
It is generated automatically when you run terraform apply and it is used by Terraform to map real world resources to your configuration, keep track of metadata, and to improve performance for large infrastructures.
you can use the command terraform state to manage the state file.
terraform state list: list all resources in the state file
$ terraform state listaws_instance.fooaws_instance.bar[0]aws_instance.bar[1]module.elb.aws_elb.mainterraform state show: show the attributes of a specific resource
$ terraform state show 'packet_device.worker'# packet_device.worker:resource "packet_device" "worker" { billing_cycle = "hourly" created = "2015-12-17T00:06:56Z" facility = "ewr1" hostname = "prod-xyz01" id = "6015bg2b-b8c4-4925-aad2-f0671d5d3b13" locked = false}terraform state mv: move a resource to another nameterraform state pull: download and output the state from remote stateterraform state push: update remote state from a local state fileterraform state rm: remove items from the state fileterraform state replace-provider: remove items from the state file
State MV
terraform state mv allow you to:
- rename a resource:
terraform state mv aws_instance.example aws_instance.example2 - move a resource into a module:
terraform state mv aws_instance.example module.example.aws_instance.example - move a module to another module:
terraform state mv module.example.aws_instance.example module.example.aws_instance.example2
to apply run terraform apply or terraform apply -target=module.example.aws_instance.example2
State Backups
When you run a terraform state command, Terraform will automatically create a backup file of the state file called terraform.tfstate.backup. \
Initialization
terraform init
terraform init command is used to initialize a working directory containing Terraform configuration files.
It will:
- download the provider plugins and initialize the backend.
- create a .terraform directory
- create a .terraform.lock.hcl file to lock the provider versions
if you change or modify dependencies, you need to run terraform init again.
terraform init -upgrade: update the provider plugins and the backendterraform init -get-plugins=false: disable automatic installation of provider pluginsterraform init -plugin-dit=PATH: specify the directory where to download the provider pluginsterraform init -lockfile=MODE: specify the lockfile behavior (readonly, writeonly, none)terraform init -reconfigure: reconfigure the backend without prompting for confirmationterraform init -backend-config=backend.hcl: specify the backend configuration file
terraform get
terraform get command is used to download and update modules from the Terraform Registry. \
Writing and Modifying
terraform fmt
terraform fmt command is used to rewrite Terraform configuration files to a canonical format and style. \
example:
resource "aws_instance" "example"{ ami = "ami-abc123" instance_type = "t2.micro"}to
resource "aws_instance" "example" { ami = "ami-abc123" instance_type = "t2.micro"}terraform validate
terraform validate command is used to validate the syntax of the Terraform configuration files. \
terraform console
terraform console command is used to provide an interactive console for evaluating expressions. \
Plan and Apply
Plan
terraform plan command check the differences between the current state and the configuration files in order to show you what will be created, updated or destroyed.
terraform plan -out=plan.out or terraform apply -out=plan.out command is used to save the plan in a file. \
Apply
terraform apply command is used to apply the changes described in the plan file.
terraform apply -auto-approve command is used to apply the changes without prompting for confirmation. \
Drift
Managed Resource Drift
Drift configuration or infrastructure is when the current state of your infrastructure does not match the state that is defined in your configuration files.
terraform plan command is used to detect drift.
terraform apply -replace command is used to replace the resource:
$ terraform apply -replace="aws_instance.example"# ...
  # aws_instance.example will be replaced, as requested-/+ resource "aws_instance" "example" {      # ...    }
terraform import command is used to import the resource: terraform import aws_instance.example i-1234567890abcdef0
terraform apply -refresh-only command is used to update the state file without updating the infrastructure.
Replacing Resources
terraform taint command is used to taint(*) a resource, it will be destroyed and recreated on the next terraform apply command.
terraform untaint command is used to untaint a resource. \
$ terraform taint aws_instance.my_web_server**it is recommended to use terraform apply -replace command instead of terraform taint command.
(*) Taint: mark a resource as tainted, forcing it to be destroyed and recreated on the next apply.
Resource Addressing
Resource addressing is used to specify a resource in a module.
aws_instance.web[3] : specify the 4th resource in the list.
resource "aws_instance" "web" { # ... count = 5}Import
terraform import command is used to import existing resources into your Terraform state.
$ terraform import aws_instance.example i-1234567890abcdef0refresh and Refresh Only Mode
terraform refresh or terraform apply -refresh-only command is used to update the state file without updating the infrastructure. \
For example, if you change remove a resource from the cloud and you want to remove it from the state file, you can use terraform refresh or terraform apply -refresh-only command to update the state file.
If you run terraform apply command, it will recreate the resource.
Troubleshooting
Terraform Troubleshooting
| Language errors | State errors | Core errors | Provider errors |
|---|---|---|---|
terraform validate | terraform refresh | TF_LOG | TF_LOG |
terraform fmt | terraform apply | Open Github Issue | Open Github Issue |
terraform version | terraform -replace [flag] |
Debugging Terraform
export TF_LOG=TRACE
export TF_LOG_PATH=terraform.log
export TF_LOG=DEBUG
export TF_LOG=INFO
export TF_LOG=WARN
export TF_LOG=ERROR
2021-12-15T20:19:28.645Z [INFO] Terraform version: 1.1.02021-12-15T20:19:28.645Z [INFO] Go runtime version: go1.17.22021-12-15T20:19:28.645Z [INFO] CLI args: []string{"terraform", "init"}2021-12-15T20:19:28.645Z [DEBUG] Attempting to open CLI config file: /home/vagrant/.terraformrc2021-12-15T20:19:28.645Z [DEBUG] File doesn't exist, but doesn't need to. Ignoring.2021-12-15T20:19:28.645Z [DEBUG] ignoring non-existing provider search directory terraform.d/plugins2021-12-15T20:19:28.645Z [DEBUG] ignoring non-existing provider search directory /home/vagrant/.terraform.d/plugins2021-12-15T20:19:28.645Z [DEBUG] ignoring non-existing provider search directory /home/vagrant/.local/share/terraform/plugins2021-12-15T20:19:28.645Z [DEBUG] ignoring non-existing provider search directory /usr/local/share/terraform/pluginsTerraform Modules
Finding Modules
To find a module you can use the Terraform Registry or Github. Only verified modules are displayed in search results.
Using Modules
Public Modules:
The syntax to specify a registry module is namespace/name/provider. \
module "vpc" { source = "terraform-aws-modules/vpc/aws" version = "3.0.0" # insert the 11 required variables here}terraform init will download the module in the .terraform directory. \
Private Modules:
The syntax to specify a private module is hostname/namespace/name/provider. \
module "vpc" { source = "app.terraform.io/example_corp/vpc/aws" version = "3.0.0" # insert the 11 required variables here}terraform login command is used to login to the Terraform Registry. \
Publishing Modules
To publish a module you need to create a repository on Github named terraform-<PROVIDER>-<NAME>.
You need to create a public repository.
To push a new version of the module, you need to create a new tag.
Verified Modules
Verified Modules are reviewed by HashiCorp and are marked as verified.
They are displayed in search results. \
Standard Module Structure
If you want to develop a module, you need to follow the standard module structure. \
├── README.md├── LICENSE├── main.tf├── variables.tf├── outputs.tf├── examples│ ├── example1│ │ ├── main.tf│ │ ├── variables.tf│ │ ├── outputs.tf│ │ └── README.md # README.md, so it will be displayed in the Terraform Registry│ └── example2│ ├── main.tf│ ├── variables.tf│ ├── outputs.tf # No README.md, so it will not be displayed in the Terraform Registry├── test│ ├── fixtures│ │ └── example.tf│ ├── integration│ │ └── example_test.go│ └── unit│ └── example_test.go└── .github └── workflows └── example.ymlTerraform Workflows
Team Workflows Overview
Write -> Plan -> Apply
Individual Practitioner (Working alone)
- Write:
- write the configuration files
- save the configuration files in a version control system (GitHub, GitLab, Bitbucket, etc…)
- you repeatadly run
terraform planandterraform validatecommands to find errors and fix them
- Plan:
- commit locally when your configuration files are ready
- Apply:
- run
terraform applycommand to review the plan - after reviewing the plan, approve it and wait for provisioning to complete
- After a successfl apply, commit your changes to the version control system
- run
Team (Working together)
- Write:
- each team member write the configuration files on their local machine
- a team member will store the configuration files in a branch (branches: per feature, per environment, per members, etc…)
- Branches allow to solve conflicts before merging the branches.
- For larger teams you can use a CI/CD pipeline to abstract away the responsibility of credentials.
- Plan:
- The CI/CD pipeline will execute
terraform plancommand to review the plan befere the merge in order to review the plan.
- The CI/CD pipeline will execute
- Apply:
- To apply the changes, you need to merge the branches which will execute a pipeline job that will execute
terraform applycommand
- To apply the changes, you need to merge the branches which will execute a pipeline job that will execute
- the DevOps team has to maintain the CI/CD pipeline
- Store the state file in a remote backend (S3, GCS, Terraform Cloud, etc…)
- They are limited in their access, only certain members can apply/destroy changes to the infrastructure
Terraform Cloud (Working together)
- Write:
- use Terraform Cloud as a remote backend
- to store variables
- to setup and integrate owr CI/CD pipeline
- Plan:
- A pull request could be created by a team member and Terraform cliu dwill automalically run
terraform plancommand on the VCS to review the code.
- A pull request could be created by a team member and Terraform cliu dwill automalically run
- Apply:
- When the Pull Request is merged, Terraform Cloud will run
terraform applycommand to apply the changes, a team member will review the plan and approve it.
- When the Pull Request is merged, Terraform Cloud will run
With Terraform Cloud, you can:
- easaly store variables and sensitive credentials
- setup and integrate your CI/CD pipeline
- store the state file in a remote backend
- manage permissions and access control
- manage multiple workspaces
- manage multiple environments
- manage multiple teams
- manage multiple VCS
Terraform Backends
Backends
They are two types of backends:
- Standard Backends
- only store the state file
- can’t perform remote operations (S3, GCS, Azure, etc…)
- Enhanced Backends
- store state file
- can perform remote operations on you machine and remotly (Terraform Cloud, Terraform Enterprise, etc…)
- can store variables and sensitive credentials
Standard Backend
S3 : AWS
AzureRM : Azure Resource Manager
GCS : Google Cloud Storage
Alibaba Cloud OSS : Alibaba Cloud Object Storage Service
Tencent Cloud COS : Tencent Cloud Object Storage
Artifactory : JFrog Artifactory is the only backend that don't have state locking
terraform { backend "s3" { bucket = "mybucket" key = "path/to/my/key" region = "us-east-1" }}Local Backend
It consists of storing the state file locally on your machine.
By default, Terraform will store the state file in a file named terraform.tfstate at the root of your working directory. \
terraform { backend "local" { path = "relative/path/to/terraform.tfstate" }}If set the backend to refence another state file so you can read its outputted values.
terraform { backend "local" config = { path = "../other_module/terraform.tfstate" }}Remote Backend
A remote backend uses the Terraform platform which is either:
- Terraform Cloud
- Terraform Enterprise
To connect Terraform Cloud to your cloud provider, you need to set your cloud-provider/backend credentials on the Terraform Cloud UI.
When you are using remote backend you need to set a Terraform Cloud workspace. \
terraform {  backend "remote" {    hostname = "app.terraform.io"    organization = "example_corp"
    workspaces {      name = "my-workspace-prod"    }  }}
If you have multiple workspaces (dev pfv prod), you can use prefix to specify the workspace.
terraform {  backend "remote" {    hostname = "app.terraform.io"    organization = "example_corp"
    workspaces {      prefix = "my-workspace-"    }  }}
Cloud Backend
terraform {  backend "remote" {    hostname = "app.terraform.io"    organization = "example_corp"
    workspaces {      name = "my-workspace-prod"    }  }}
it is recommended to use cloud block instead of backend block.
terraform { cloud { hostname = "app.terraform.io" organization = "example_corp" workspaces { tags = ["my-workspace-prod"] } }}Backend Initialization
terraform init -backend-config=backend.hcl # command is used to specify the backend configuration file.terraform { backend "remote" { }}workspaces { name = "my-workspace-prod" }hostname = "app.terraform.io"organization = "company"State Locking
terraform_remote_state data source is used to read the state file from another remote or local backend in order to read its outputted values.
It’s useful to use the latest state file from a remote backend.
# from remote backenddata "terraform_remote_state" "vpc" { # specify the kind of resource you want to get  backend = "remote"
  config = {    organization = "hashicorp" # specify the organization    workspaces = {      name = "vpc-prod" # specify the workspace where the state file is stored    }  }}
# Terraform >= 0.12resource "aws_instance" "foo" {  # ...  subnet_id = data.terraform_remote_state.vpc.outputs.subnet_id}
# from local backenddata "terraform_remote_state" "vpc" { # specify the kind of resource you want to get backend = "local"
config = { path = "..." # specify the path to the state file }}
# Terraform >= 0.12resource "aws_instance" "foo" { # ... subnet_id = data.terraform_remote_state.vpc.outputs.subnet_id}- only root level output values are accessible
- resource data and output values from nested modules are not accessible
- you need to configure a passthrough in the root module to expose the output values from nested modules
# root modulemodule "vpc" {  source = "./modules/vpc"}
output "vpc_id" {  value = module.vpc.vpc_id}
Alternative to terraform_remote_state
Currently the terraform_remote_state data source only expose output values from the state file, for that, they you need to get access to the entire state file, which often includes some sensitive information. \
So if you want to expose a data source, it’s recommended to publish it, instead of accessing it via the terraform state file.
data "aws_s3_bucket" "example" { bucket = "my-bucket.com"}Protecting Sensitive Data
In order to protect sensitive data, Terraform will lock the state file when you run terraform apply command.
If you want to unlock the state file, you need to run terraform force-unlock command.
The Lock is used in order to prevent multiple users from modifying the state file at the same time. \
$ terraform force-unlock 10a2b3c4-d5e6-fabc-1234-567890abcdef -force # -force is used to skip the confirmationTerraform Ignore File
Terraform state contain sensitive data, so it is vulnerable to attacks. \
Local state:
When you are using local backend, the state file is stored in plan-text JSON files. \
- you can use
.gitignorefile to ignore the state file - becareful to not sharing the state file with anyone
Remote state: \
- Terraform Cloud
- the state file is encrypted by default
- the state file is encrypted at rest
- the state file is encrypted in transit
- Third-Party Remote Backends (S3, GCS, Azure, etc…)
- verify the security and compliance requirements
- S3 : you need to turn on the encryption and versioning
Standard Backend Type S3
You can add a .terraformignore file at the root of your configuration to ignore files and directories.
If this file is not present, by default, Terraform will ignore the following files and directories:
- .git/
- .terraform/
! you can have multiple .terraformignore files in your configuration, enven in subdirectories, compared to .gitignore. \
Resources and Complex Types
Resources
Terraform resources are the most important element in the Terraform language.
A resource block describes one or more infrastructure objects, such as virtual networks, databases, compute instances, or higher-level components such as DNS records. \
resource "aws_instance" "example" { # AWS EC2 instance ami = "ami-abc123" instance_type = "t2.micro"}Some resource types provide a special timeouts nested block argument that allows you to customize the timeouts for specific operations. \
resource "aws_instance" "example" {  ami           = "ami-abc123"  instance_type = "t2.micro"
  timeouts {    create = "30m"    delete = "5m"  }}
Complex Types
Complex types are used to group multiple values into a single value (list, map, object, tuple, set). \
# listvariable "list_type" { description = "This is a variable of type list" type = list(string) default = ["string1", "string2", "string3"]}Collection Types
Collection types are used to group multiple values into a single value (list, map, set). \
Structural Types
Structural Typas allow to a group of values with different types into a single value (object, tuple). \
# objectvariable "object_type" { description = "This is a variable of type object" type        = object({   key1 = string   key2 = number # required   key3 = optional(bool) # optional }) default = { # you can use the default value   key1 = "string"   key2 = 1   key3 = optional(bool) # optional }}
# tuplevariable "tuple_type" { description = "This is a variable of type tuple" type        = tuple([string, number, optional(bool)]) default     = ["string", 1, optional(bool)] # you can use the default value}
The return result between an object and tuple is the same, but the difference is that the object is a map and the tuple is a list. \
# object{  name : "John"  age : 30}
# tuple["John", 30]
Built in Functions
Numeric Functions
- abs : returns the absolute value of a number
> abs(-1)1- ceil : returns the nearest integer that is greater than or equal to a number
> ceil(1.5)2- log : returns the natural logarithm of a number
> log(2)0.6931471805599453- floor : returns the nearest integer that is less than or equal to a number
> floor(1.5)1- max : returns the maximum value of a list of numbers
> max([1, 2, 3])3- min : returns the minimum value of a list of numbers
> min([1, 2, 3])1- pow : returns a number raised to the power of another number
> pow(2, 3)8- signum : returns the sign of a number
> signum(-1)-1- sqrt : returns the square root of a number
> sqrt(4)2- parseint : returns the integer value of a string
> parseint("1")1> parseint("FF", 16)255String Functions
- chomp : removes trailing newline characters from a string
> chomp("hello\n")hello- format : returns a formatted string
> format("%s-%s", "hello", "world")hello-world- formatlist : returns a formatted string
> formatlist("%s-%s", ["hello", "world"])hello-world- indent : returns a string with each line indented by a given number of spaces
> indent(2, "hello\nworld") hello world- join : returns a string by concatenating a list of strings with a given separator
> join(",", ["hello", "world"])hello,world- upper : returns a string with all characters from a given string converted to uppercase
> upper("hello")HELLO- lower : returns a string with all characters from a given string converted to lowercase
> lower("HELLO")hello- regex : returns a string with all matches of a given regular expression replaced with a given replacement string
> regex("hello world", "^hello", "goodbye")goodbye world- regexall : returns a list of strings with all matches of a given regular expression replaced with a given replacement string
> regexall("hello world", "^hello", "goodbye")["goodbye world"]- replace : returns a string with all matches of a given substring replaced with a given replacement string
> replace("hello world", "hello", "goodbye")goodbye world- split : returns a list of strings by splitting a given string on a given separator
> split(",", "hello,world")["hello", "world"]- substr : returns a substring of a given string
> substr("hello world", 0, 5)hello- title : returns a string with all characters from a given string converted to title case
> title("hello world")Hello World- trim : returns a string with all leading and trailing whitespace removed
> trim(" hello world ")hello world- trimprefix : returns a string with a given prefix removed
> trimprefix("hello world", "hello")world- trimsuffix : returns a string with a given suffix removed
> trimsuffix("hello world", "world")hello- trimspaces : returns a string with all leading and trailing whitespace removed and all internal sequences of whitespace replaced with a single space
> trimspaces(" hello world ")hello world- strrev : returns a string with all characters from a given string reversed
> strrev("hello")ollehCollection Functions
- alltrue : returns true if all elements from a given list are true
> alltrue([true, true, true])true- anytrue : returns true if any element from a given list is true
> anytrue([true, false, false])true- chunklist : returns a list of lists by splitting a given list into chunks of a given size
> chunklist([1, 2, 3, 4, 5], 2)[[1, 2], [3, 4], [5]]- coalesce : returns the first non-null value from a given list
> coalesce([null, "hello", "world"])hello- coalescelist : returns the first non-null value from a given list
> coalescelist(["a", "b"], ["c", "d"]])["a", "b"]- compact : returns a list with all null values removed
> compact([null, "hello", null, "world"])["hello", "world"]- concat : returns a list by concatenating a list of lists
> concat([[1, 2], [3, 4]])[1, 2, 3, 4]- contains : returns true if a given list contains a given value
> contains([1, 2, 3], 2)true- distinct : returns a list with all duplicate values removed
> distinct([1, 2, 2, 3])[1, 2, 3]- element : returns the element of a given list at a given index
> element([1, 2, 3], 1)2- filter : returns a list with all elements from a given list that match a given condition
> filter([1, 2, 3], x -> x > 1)[2, 3]- flatten : returns a list by flattening a list of lists
> flatten([[1, 2], [3, 4]])[1, 2, 3, 4]- index : returns the index of a given value in a given list
> index([1, 2, 3], 2)1- keys : returns a list of keys from a given map
> keys({a = 1, b = 2})["a", "b"]- length : returns the length of a given list
> length([1, 2, 3])3- lookup : returns the value of a given key in a given map
> lookup({a = 1, b = 2}, "a", "not founded")1> lookup({a = 1, b = 2}, "g", "not founded")not founded- matchkeys : returns a list of keys from a given map that match a given regular expression
> matchkeys(["i-1234567890abcdef0", "i-1234567890abcdef1"], ["us-east", "us-west"], ["us-east"])["i-1234567890abcdef0"]- merge : returns a map by merging a list of maps
> merge([{a = 1}, {b = 2}]){a = 1, b = 2}- one
> one([])null> one(["hello"])"hello"> one(["hello", "goodbye"])Error: Invalid function argument- range : returns a list of numbers from a given start number to a given end number
> range(1, 3)[1, 2, 3]> range(3)[0, 1, 2]- reverse : returns a list with all elements from a given list in reverse order
> reverse([1, 2, 3])[3, 2, 1]- setintersection : returns a list of elements that are present in all given sets
> setintersection([1, 2, 3], [2, 3, 4])[2, 3]- setproduct : returns a list of all possible combinations of elements from all given sets
> setproduct(["development", "staging", "production"], ["app1", "app2"])[["development", "app1"], ["development", "app2"], ["staging", "app1"], ["staging", "app2"], ["production", "app1"], ["production", "app2"]]- setunion : returns a list of all elements from all given sets
> setunion([1, 2], [2, 3])[1, 2, 3]- setsubtract : returns a list of elements that are present in the first set but not in the second set
> setsubtract([1, 2, 3], [2, 3, 4])[1]- setdifference : returns a list of elements that are present in the first set but not in the second set and vice versa
> setdifference([1, 2, 3], [2, 3, 4])[1, 4]- slice : returns a list by slicing a given list from a given start index to a given end index
> slice([1, 2, 3, 4, 5], 1, 3)[2, 3]- sort : returns a list with all elements from a given list sorted in ascending order
> sort([3, 2, 1])[1, 2, 3]- suum : returns the sum of all numbers from a given list
> sum([1, 2, 3])6- transpose: returns a list of lists by transposing a given list of lists
> transpose([[1, 2], [3, 4]])[[1, 3], [2, 4]]- values : returns a list of values from a given map
> values({a = 1, b = 2})[1, 2]- zipmap : returns a map by combining a list of keys with a list of values
> zipmap(["a", "b"], [1, 2]){a = 1, b = 2}- sortdesc : returns a list with all elements from a given list sorted in descending order
> sortdesc([1, 2, 3])[3, 2, 1]Encoding and Decoding Functions
- base64decode : returns a string by decoding a given base64-encoded string
> base64decode("aGVsbG8=")hello- base64encode : returns a string by encoding a given string to base64
> base64encode("hello")aGVsbG8=- urldecode
> urldecode("hello%20world")hello world- urlencode
> urlencode("hello world")hello%20world- jsondecode / jsonencode
- yamldecode / yamlencode
- csvdecode
Filesystem Functions
- abspath : returns the absolute path of a given path
> abspath("hello")/home/vagrant/hello- dirname : returns the directory name of a given path
> dirname("/home/vagrant/hello")/home/vagrant- pathexpand : returns the path of a given path with environment variables expanded
> pathexpand("$HOME/hello")/home/vagrant/hello- basename : returns the base name of a given path
> basename("/home/vagrant/hello.txt")hello.txt- file : returns the contents of a given file
> file("hello.txt")hello world- fileexists : returns true if a given file exists
> fileexists("hello.txt")true- fileset : returns a list of files in a given directory
> fileset("/home/vagrant", "**/*.txt")["/home/vagrant/hello.txt"]- filebase64 : returns the contents of a given file encoded to base64
> filebase64("hello.txt")aGVsbG8gd29ybGQ=- templatefile : returns a string by rendering a given template file
%{ for addr in ipaddrs ~}backend ${addr}:{port}%{ endfor ~}> templatefile("hello.tpl", { ipaddrs = ["10.0.0.1", "10.0.0.2"], port = 8080 })backend 10.0.0.1:8080backend 10.0.0.2:8080Date and Time Functions
- timestamp : returns the current timestamp
> timestamp()2021-12-16T15:00:00Z- timeadd : returns a timestamp by adding a given duration to a given timestamp
> timeadd(timestamp(), "1h")2021-12-16T16:00:00Z- formatdate : returns a string by formatting a given timestamp
> formatdate(timestamp(), "%Y-%m-%d")2021-12-16Hash and Crypto Functions
- bcrypt : returns a bcrypt hash of a given string
> bcrypt("hello")$2a$10$- filemd5
- filesha1
- filesha256
- filesha512
- hmacsha1
- hmacsha256
- hmacsha512
- md5
- sha1
- …
IP Network Functions
- cidrhost : returns the host address of a given CIDR block
> cidrhost("10.27.127.0/20", 16)10.27.112.16- cidrnetmask : returns the netmask of a given CIDR block
> cidrnetmask("172.16.9.9/12")255.240.0.0- cidrsubnet : returns a subnet address of a given CIDR block
> cidrsubnet("172.16.0.0/12", 4, 2)172.18.0.0/16- cidrsubnets : returns a list of subnet addresses of a given CIDR block
> cidrsubnets("10.1.0.0/16", 4, 4, 8, 4)[ "10.1.0.0/20", "10.1.16.0/20", "10.1.32.0/24", "10.1.48.0/20",]Type Conversion Functions
- can : verify if a given value can produce an error
> local.foo{ "bar" = "baz"}> can(local.foo.bar)true- nonsensitive : returns a non-sensitive value
output "sensitive_example_hash" { value = nonsensitive(sha256(var.sensitive_example))}- sensitive : returns a sensitive value
output "sensitive_example_hash" { value = sensitive(sha256(var.sensitive_example))}- tobool : returns a boolean value
> tobool("true")true- tolist : returns a list
> tolist("hello")["hello"]- tomap : returns a map
> tomap("hello"){hello = ""}- tonumber : returns a number
> tonumber("1")1- tostring : returns a string
> tostring(1)"1"- toset : returns a set
> toset("hello")["hello"]- try : returns a value or an error
> try("hello")hello> try(1/0)Error: Invalid value for number: strconv.ParseFloat: parsing "Infinity": invalid syntax- trytonumber : returns a number or an error
> trytonumber("1")1> trytonumber("hello")Error: Invalid value for number: strconv.ParseFloat: parsing "hello": invalid syntaxTerraform Cloud
Terraform Cloud Terms
- Organisation
- Workspace (Team 1)
- RUN [Dev] (represent the terraform run environment)
- RUN [Prod]
- RUN [Staging]
- Workspace (Team 1, Team 2)
- RUN [Dev]
- RUN [Prod]
- RUN [Staging]
- Workspace (Team 2)
- RUN [Dev]
- RUN [Prod]
- RUN [Staging]
- Workspace (Team 1)
Run Workflows
You can use:
- Local CLI (
terraform planandterraform applycommands) - Using VCS, pull request (GitHub, GitLab, Bitbucket, etc…)
- Terraform Cloud API
Permissions
Organization-level permissions manage ressources or settings accros an entire organization. \
- Manage Policies : create, edit and delete the organization Sentinel policies
- Manage workspaces : create, edit and delete the organization workspaces
- Manage VCS settings : manage the organization VCS settings, and SSH keys
Each organization had organization owners, who can manage all organization-level permissions. \
Workspace-level permissions manage ressources or settings for a specific workspace.
you can apply workspace-level permissions to a user via custom workspace permissions or team membership.
you can create roles to manage workspace-level permissions (admin, read, plan, write). \
API Tokens
-
Organization API Tokens:
- Have Permissions across the entire organization
- Each organization can have one valid API token at a time
- Only oragnization owners can generate or revoke an organization’s token
- Organization API tokens are designed for creating and configuring workspaces and teams.
- Not recommended as an all-purpose interface to Terraform Cloud
-
Team API Tokens:
- Give access to the workspaces that the team has access to.
- Each team can have one valid API token at a time
- Any member of the team can generate or revoke a team’s token
- Designed for performing API opérations on workspaces/
-
User API Tokens:
- Most flexible token, because it give permissions associated with the user’s role.
- Could be assigned to a user or a machine
More information here -> Terraform Permissions
Private Registry
Terraform Cloud Private Registry allow to your team to publish private modules for your organization.
All users in your organization can access the private registry. \
Cost Estimation
Terraform Cloud Cost Estimation allow to your team to estimate the cost of your infrastructure before applying the changes. \
currently, cost estimation is only available for AWS, Azure and GCP. \
Migrating Default Local State
To migrate your local configuration to Terraform Cloud, you need to run the following commands:
- Create a workspace in Terraform Cloud
- Replace the backend configuration in your local configuration with the backend configuration from the Terraform Cloud workspace
terraform {  backend "remote" {    hostname = "app.terraform.io"    organization = "example_corp"
workspaces { name = "my-workspace-prod" } }}- Run
terraform initcommand to migrate your local state to Terraform Cloud
> terraform initDo you want to copy existing state to the new backend?  Pre-existing state was found while migrating the previous "local" backend to the  newly configured "remote" backend. No existing state was found in the newly  configured "remote" backend. Do you want to copy this state to the new "remote"  backend? Enter "yes" to copy and "no" to start with an empty state.
  Enter a value: yes
VCS Integration
On Terraform Cloud, you can integrate your VCS (GitHub, GitLab, Bitbucket, Azure DevOps) to your Terraform Cloud workspace. \
Run Environment
Terraform Cloud executes Terraform runs in a run environment.
What is a run environment ?
A run environment is a Virtual Machine or Container running on x86_64 that is used to execute Terraform runs. \
During the execution, Terraform Cloud will inject on each run some environment variables:
TFC_RUN_IDTFC_WORKSPACE_NAMETFC_WORKSPACE_SLUGTFC_CONFIGURATION_VERSION_GIT_BRANCHTFC_CONFIGURATION_VERSION_GIT_COMMIT_SHATFC_CONFIGURATION_VERSION_GIT_TAG
Cloud Agents
Terraform Cloud Agents allow to your team to run Terraform runs on your own infrastructure. (Om-Premise : OpenStack) \
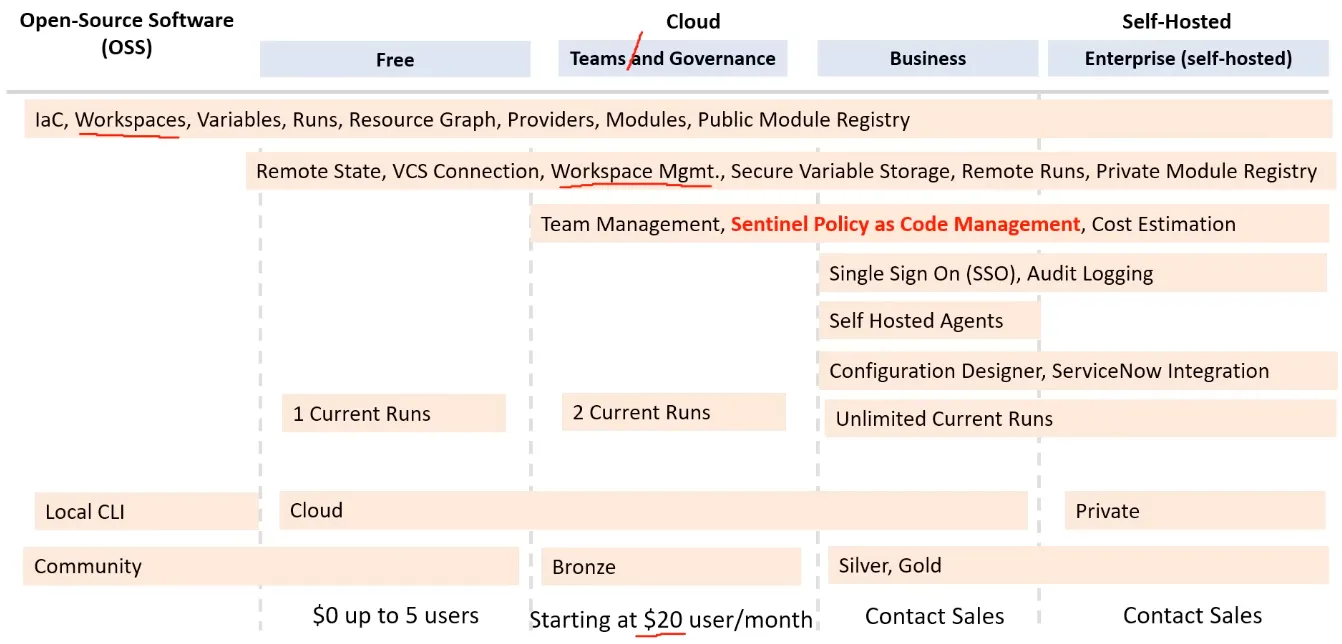
Terraform Cloud Features & Pricing
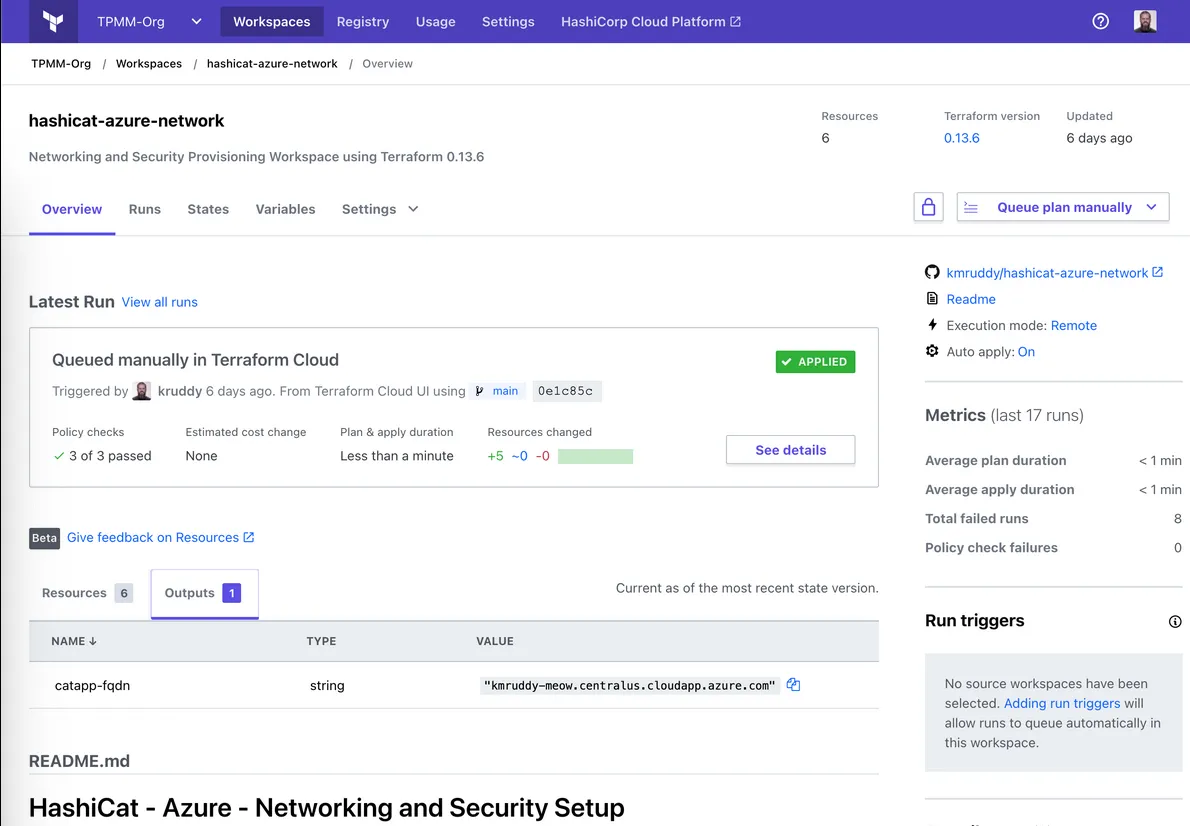
Workspaces
Workspaces on Terraform Cloud
Terraform Cloud Workspaces allow to your team to manage multiple state files and environments (dev, staging, prod) and multiple teams. \
Workspaces Internals
Local State: The workspace states is stored in a folder called /terraform.tfstate.d
Remote State: The workspace states is stored in a remote backend
Workspaces CLI commands
terraform workspace list: list all workspaces
> terraform workspace list default* dev prod stagingterraform workspace new: create a new workspace
> terraform workspace new testCreated and switched to workspace "test"!terraform workspace select: select a workspace
> terraform workspace select testSwitched to workspace "test".terraform workspace show: show the current workspace
> terraform workspace showtestterraform workspace delete: delete a workspace
> terraform workspace delete testDeleted workspace "test"!Workspaces Differences
| Component | Local Terraform | Terraform Cloud |
|---|---|---|
| Terraform Configuration | On disk | in liked version constrol repository, or uploaded via API/CLI |
| Variables values | .tfvars file, CLI args, shell env | in workspace |
| State file | on dick or in remote backend | in workspace |
| Credentials and Secrets | shell env, prompts export | in workspace stored as sensitive variables |
Sentinel and Terraform
Sentinel
Sentinel is an embedded Policy-as-Code Framework created by Hashicorp and integred with Terraform.
Features of Sentinel:
- Embedded: enable policy enforcement in the data path to actively reject violating behavior instead of passively detecting.
- Fine-grained, condition-based policy: Make policy decisions based on the condition of other values.
- Multiple Enforcement Levels: Advisory, Soft and hard-mandatory levels allow policy writers to warn on or reject behaviour
- External Information: Source external information to make holistic policy decisions
- Multi-Cloud Compatible: Ensure infrastructure changes are within business and regulatory policy across multiple providers
Sentinel Policy Language Example
Example of Sentinel Policy that restrict Availability zones for EC2 instances on AWS
# NOTE that you must explicitly specify availability_zone on all aws_instances# or this policy will fail since the computed availability_zone is not available# to plan
import "tfplan"
# Get all AWS instances from all modulesget_aws_instances = func() {    instances = []    for tfplan.module_paths as path {        instances += values(tfplan.module(path).resources.aws_instance) else []    }    return instances}
# Allowed availability zonesallowed_zones = [  "us-east-1a", "us-east-1b", "us-east-1c", "us-east-1d", "us-east-1e", "us-east-1f",]
aws_instances = get_aws_instances()
# Rule to restrict availability zones and regionregion_allowed = rule {    all aws_instances as _, instances {      all instances as index, r {       r.applied.availability_zone in allowed_zones      }    }}
# Main rule that requires other rules to be truemain = rule {  (region_allowed) else true}
Sentinel with Terraform
Sentinel can be integrated with Terraform Cloud and Terraform Enterprise as part of your IaC provisioning Pipeline. \
On Terraform Cloud you need to create a Policy Set and apply it to a workspace. \
Packer
HashiCorp Packer
Git -> CI/CD -> Packer -> Ansible -> AWS AMI -> Terraform (data source which referce the template AMI) -> AWS (repeat on each machine)
Packer Template File
Packer command:
packer init .: initialize the template file (download plugings)packer fmt .: format the template filepacker validate <FILE_NAME>: validate the template filepacker build <FILE_NAME>: build the template file
Terraform and Packer Integration
Create your AMI with Packer and use it with Terraform. \
data "aws_ami" "example" { most_recent = true owners = ["self"] filter { name = "name" values = ["my-ami"] }}Consul
Terraform and Consul
Consul is a service mesh solution providing a full featured control plane with service discovery, configuration, and segmentation functionality. \
Vault
HashiCorp Vault
6:23:00